June 2024: the Milestones Prayer for St. John's Episcopal Church
- Heather Bungard-Janney
- Nov 28, 2025
- 9 min read

A couple of years ago, I was invited to join the choir of St. John's Episcopal Church in my current hometown. While I'm not very religious at all, I've always found comfort in music, especially in performing choral music, and the friend who invited me thought I would get something out of singing at St. John's, so I gave it a try. The local congregation has turned out to be a warm, welcoming community, with a pretty great choir, and I've stayed to sing with them for three or maybe four years now.
For those unfamiliar, the Episcopal Church is one of the more "ceremonial" Christian churches out there; they lean more towards the "stained glass and pipe organ" end of the Christian spectrum. The standard Sunday service follows a pretty clear script each week, and includes quite a lot of singing, but not a lot of deviation beyond where we are in the liturgical year (Advent vs. Lent or Pentecost, for example). What this means is that, if you've ever attended an Episcopal service anywhere in the United States, you're probably already familiar with most of what happens at St. John's.
However, they have one small variation, a beloved local tradition, that I've learned most other Episcopal churches don't include: about midway through the service, where they pause to wish each other peace and share announcements, they wrap up that interlude with a prayer honoring "birthdays, anniversaries, or other milestones."
From the Book of Common Prayer:
51. For a Birthday
Watch over thy child, O Lord, as his days increase; bless and guide him wherever he may be. Strengthen him when he stands; comfort him when discouraged or sorrowful; raise him up if he fall; and in his heart may thy peace which passeth understanding abide all the days of his life; through Jesus Christ our Lord. Amen.
The language is updated, and include all "your children" instead of just one "child," but the congregation of St. John's includes this prayer in every standard service throughout the year. As I said, I'm not especially religious, but something about the simplicity of that prayer gets to me. The Milestones Prayer has become my favorite (non-musical) part of the weekly St. John's service.
After being a part of the St. John's community for a couple of years, I wanted to thank them for welcoming my little heathen self so readily, and I also wanted to create something that they might be able to raffle or auction off to raise money for the local charities that they support, and I thought of the Milestones Prayer as the perfect piece to put on paper. The plan was to create one piece for display, and a second piece, a twin to the first, as a fundraiser. I approached their rector to see if that would be something they would appreciate, and he gave an enthusiastic yes. The only change to the plan was that instead of auctioning off the second piece, he asked to keep it for himself, pledging to donate 90% of the value of the piece to charity, with the remaining 10% set aside for me.
Step one, of course, is the test drive, what I call the "mockup," where I make sure of the general concept and see what will work. For some reason, I did all the text on this first one in pencil, rather than pulling out a calligraphy pen, and then I colored it with some of my kid's high quality art markers.

A second mockup, dialing in the size and spacing. I've got a big arrow at the right of the second line, "Your children", to remind myself to shove it over so it's closer to centered.

I wanted to do a different art style for this one than I've attempted before. This decoration around the capitals is called penwork, or sometimes filigree. It's actually pretty common in manuscripts from the Middle Ages, I believe mainly the 1300s through into the first half of the 1400s, but it wouldn't surprise me to learn that filigree penwork was around for a broader period than that. Like a lot of my favorite art styles, it's basically carefully planned doodling: simple steps layered on top of each other to give a complex result.

There are a lot of different things you can do with the fill in these letters, and I tested a few ideas, as you can see below. I knew I wanted at least one cross, since this is genuinely a religious piece in a way that I usually only imitate. The eagle clutching a book in its talons is meant to represent John the Evangelist; it's been a while, but I remember hunting through source images to find a good depiction of the eagle, as well as variations on the vines that are inside the different D initials.

Next, I needed to test my red and blue inks with my crow quill pen. A crow quill is meant for fine line work, but I've had pens in the past that snagged their sharp point on the paper and ruined the lines. I also wanted to be sure I could draw the various vine shapes in ink without necessarily needing to sketch them all in pencil first.

I believe I also needed to test some gesso I had just bought, to make sure it would take the gold. You can see here that the results were... not great. More on that later.

The red ink worked, and the blue did as well, which was a relief. I never like to assume that all my stuff from one supplier or brand name will behave the same way. Paints especially can vary widely. Test everything!

Little subtle detail, using red for the cross and blue for the rest of the decoration here. I liked that, and the second mini cross inside the first.

I went to Twinrocker Paper and got a couple sheets of handmade paper, with their famous feathery, deckled edge. Layout on a sheet of paper with no straight edges to it is a bit of a challenge, but not impossible. A carpenter's square comes in handy if you have one, to guarantee a good 90 degree angle.
I opted for a nice sturdy Uncial script, which predates all that filigree by a good 600 years, but it had the advantage of being more legible than the contemporary Gothic script; the Lombardic capitals also borrow elements from both Roman and Uncial alphabets, so the rounded text here fit nicely with the capitals, even if the filigree technically doesn't.

Time to gild! If you follow this blog at all, you know that gilding before painting is the general rule in European scribal work, and I followed that rule here.

The gesso behaved, but was very matte when it went down. Fortunately, good gesso has a really neat property to it (see below):

You can polish gesso prior to adding the gold, to get a smooth, shiny surface. Note the difference between the O, which I haven't gotten to yet, and the R-D. Gold leaf shows every blemish and artifact of texture of whatever you put it on. You can see the ridges of your fingerprints through it, because the leaf is just that thin. So the smoother you can make that gesso before the gold goes down, the better, believe me.

Now to really put the gesso to the test, and actually gild it. Apply the gold, then hold your breath as you brush away the excess, and see what "took" and what didn't.

Ah, success.

I almost always work with patent leaf, which is adhered to a sheet of tissue paper by static electricity. Sometimes, the leaf will come away from the tissue paper while you're working with it, and then you get a whole lot of excess, as you see to the left of this photo. It's not the end of the world; I keep a little jar for my gold scraps, and I reuse the large pieces to gild smaller areas, or patch anything that didn't stick well the first time around.

Speaking of things that didn't stick well the first time around... Sigh. You can see a lot of bare areas here, but you can also see a pile of scrap that I will use to fix it.

Patch, patchity patch. This could have been because of ambient humidity - gesso is very sensitive to changes in moisture - or could have had something to do with the formulation of the gesso itself. Gesso is sensitive enough to humifity that the people who make it will alter their recipes, based on where they live and the time of year. Winter gesso and summer gesso, where I live, would need different proportions to their ingredients in order to work well.

Fortunately, the patches worked just fine on this first piece.

I often work upside down, either because I'm lefthanded or because doing so brings the top edge of the sheet closer to where I'm sitting. Here is my first look at the sheet rightside-up, with the gold in place.

At last, it's time to start adding color. While I tested colored inks for the filigree, these letters are much larger areas, so I did use paint and a fine brush for them.

This blue made me really happy. A note: because of their "dual ancestry" from both Uncial and Roman, Lombardic capitals give you some options in some of the letter shapes. I have a different D in the gold and in the blue, and two different E shapes as well in the blue. There are also two different A shapes and T shapes in the red text. If you have time, you might want to go through this photo and see if you can spot the differences.

As much as I liked the blue paint, I might have wanted to color match it to the blue ink a little better. You can see that the ink in the filigree is considerably darker. Still, the filigree itself came out quite well around the gold. Another option I could have gone with would be purple, but I wanted to keep things limited for these pieces.

If anything, the red filigree around the blue looks even better. This first page is now finished, with extra penwork flourishes coming off the edges of the filigreed letters to extend into the margins a little bit.

Extreme close up of the eagle, with red halo and book.

And a closeup of "Amen," with the red filigree within and between the letters.

For the second piece, intended to be a twin to the first one, I decided to pre-ink the capitals, for reasons I can no longer recall. It might have been visibility, or it might have been to provide better guidelines when I started painting. I don't remember anymore.

The gesso is laid and ready to go, but...

Not only did the gold not stick the first or second (or third!) times, my attempt to solve the problem, by adding something sticky over the top of the gesso, backfired; instead of getting the gesso nice and tacky to take the gold, I re-wet it and brushed large amounts of it away, resulting in terrible pits where the gold would still not stick. Absolute disaster.
I don't remember what I did to fix this anymore, since the piece is over a year old now, but I think I almost would have had to reapply gesso, to fill in the pits and smooth over the surface. If I were working on vellum, I could have tried to remove all of this previous application and start over, but I couldn't do that on handmade paper without risking severe damage to the sheet itself. I did fix it, though.

I"ve included this picture of my finger covered with gold to prove a point: when I say that gold reveals every texture that is hiding under it, I'm really not kidding. If you look close, you really can see my fingerprints here, through the gold itself.

If you look at the straight part of the D and the curved parts of the R here, you may be able to see the height difference in the gesso, but at least it's smoother than those horrible pits. And it took the gold this time, too.

Here we are, all better and ready to proceed.

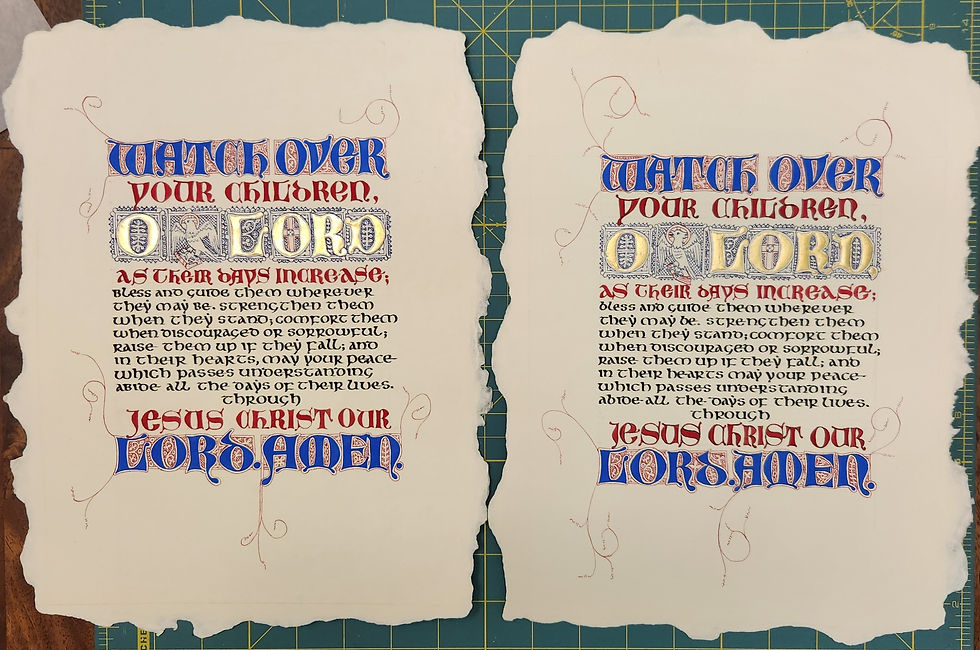
I'll skip the repeat of adding all those colors and details in, and just show you the finished "twin". Apart from minute differences in the detailing, the only way you should be able to tell these two pieces apart is that the first one is missing the comma after "O Lord", while I remembered to include it in the second piece.

Proof that I did in fact make two pieces! There are differences in the flourishes that extend into the margins, the eagles are in ever so slightly different postures, and so on, but the family resemblance here is pretty strong, I'd say.
The rector was pleased to receive both of these pieces; so pleased, in fact, that once they were matted and framed a few weeks later, he displayed one of the pieces during Sunday service, before moving it to its permanent home in the St. John's common room. The other is with the rector himself, hanging just inside his front door, as I've been told.
St. John's Episcopal continues to be a warm and welcoming place, even as it has navigated staff changes this past year, and it makes me smile each Sunday to walk past my piece hanging in the commons, on my way to the sanctuary to sing with the rest of the choir.


Comments